Approval Process
- An approval process is an automated business process that an organization can use to approve records in Salesforce.
- An approval process specifies
Approval Steps
Approver
Approval Actions
Approval Process overview

- Approval process assign approval requests to various users.
— Entry criteria to enter this step.
— Approve, who can approve requests for those records.
— The first approval step in a process also specifies the actin to take if a record does not advance to that step.
- Approval request is an email notifying the Assigned Approval that a record was submitted for approval and his or her approval is requested.
Approval steps and Actions
- When a user first requests approval for a new case,initial submission actions occur.
- The default intial submission action locks the record.
- This action ensures that other users (except for approvers and administrators)can’t change the record while the record is pending approval.
- Other submission actions include sending an email alert,updating a field on a record, creating a task,and sending an outbound message.
- Approval steps assign approval requests to various users and define the chain of approval for a particular approval process.
- An approval process can have only 15 steps per process.
- An approval process can have up to 25 approvers per step.
Steps to configure Approval process :
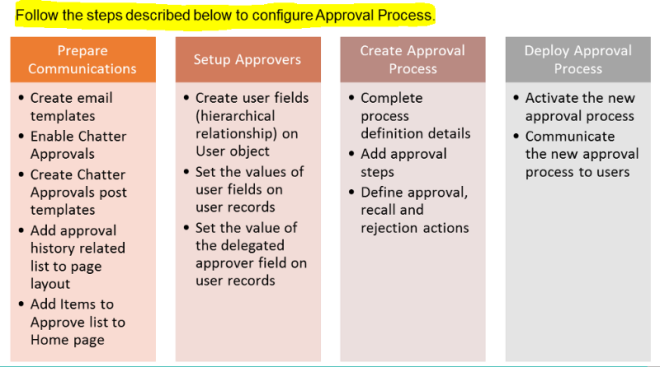
Creating Approval Process
- Creating Approval Process for the Cases Object
- Specify Entry Criteria for the Rule
- Specify Approver Field and Record Editability Properties
- Select Notification Templates and Select Fields to Display on Approval Page Layout
- Specify Initial Submitters
- Specifying Approval Steps and Activating Approval Process
Step 1 : Creating Approval Process for the Cases Object
a. Navigate to Setup → Build → Create → Workflows and Approvals → Approval Processes
b. Select Case Object
c. Click on Create New Approval Process and select “Use Standard Setup Wizard”.

d. Specify Name as Approval Process for Case. Note that Unique Name gets auto populated.
e. Optionally provide description and click Next.

Step 2 : Specify Entry Criteria for the Rule
a. Select Formula Evaluates to true for using the approval process.
b. Specify true in the formula editor. This ensures that this approval process is evaluated for all the Case records. Click Next.

Step 3 : Specify Approver Field and Record Editability Properties?
a. Select User’s Manager for the next automated approver determined by field.
b. Check on the Use Approver Field of Case Owner checkbox.
c. Select Administrators Only can Edit for the Record Editability options. Click Next.

Step 4 : Select Notification Templates and Select Fields to Display on Approval Page Layout
a. Select the email template that will be used to notify approvers that an approval request has been assigned to them. Note that this template will be used for all steps for this process.
b. If you do not have a template ready. You can create a new template by clicking on Create New Template link.

c. Select Fields to be displayed on the Approver.
d. Click on the Display Approval history information along with the above selected fields checkbox.
e. Select the appropriate security settings according to the business requirement.

Step 5 : Specify Initial Submitters
a. Specify which users are allowed to submit the initial request for approval.
b. Select Case Owner in this scenario.

c. Click on the checkbox Add the Approval History related list to all Case page layouts.
d. Click on the checkbox Allow submitters to recall approval requests.

e. You have successfully configured Approval Process. Now you can add Approval Steps.
f. Jump Start Wizard on the other hand automatically checks all these details and allows you to directly define the Approval steps.
g. Select one of the following options and click Go. Let us create Approval steps right away.

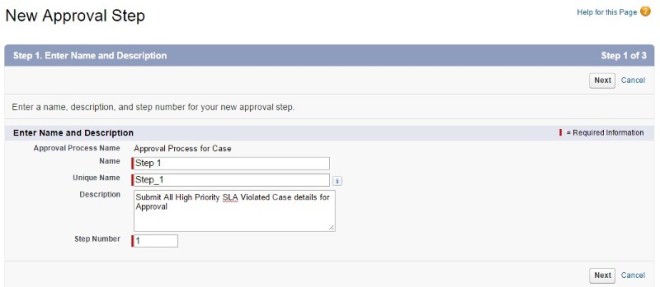
Step 6 : Specifying Approval Steps and Activating Approval Process
a. Specify Name for the step as Step 1. Note that unique name gets auto populated.
b. Specify Description as Submit All High Priority SLA Violated Case details for Approval.
c. Specify Step Number as 1. Click Next.
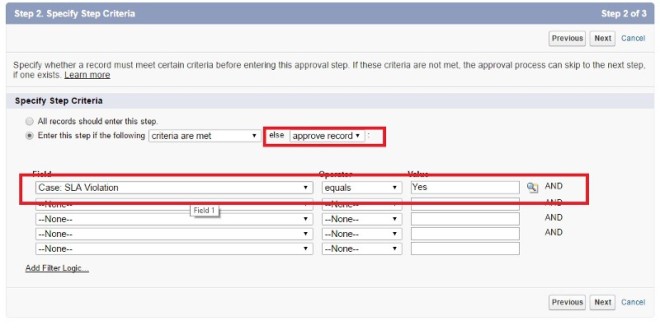
d. Specify Entry Criteria for Step 1.
e. Specify SLA Violation equals Yes as the Criteria to enter into this step. Click Next.
f. Select Approver for the Step. You have already configured this as the User Manager while defining the Approval Process in Step number 3. Click Save

g. Create Appropriate Approval Actions similar to Workflow Actions.
h. Select Email Alert as the new Approval Action and click Go.

i. Select appropriate Email Template which has been created earlier and define Email Alert action.
j. By default, Salesforce creates Record lock as the Initial Submission Action. If you need to add any further action click on Add New button and add appropriate action.
k. You can also define Final Approval / Rejection actions. By default the record gets locked as final approval action. You can change to unlock the record or add new actions if required.

l. Click on the Activate button.
